How-To
How-to: cloth diapers
The GMD 16 page How-To Wash Diapers Booklet is available when you add it to the cart: How To Wash Cloth Diapers Booklet.
Workhorse are first and covers.
Size half flats are at 5:45 minutes
Prefolds are at the 8 minute mark.
Link to how to wash diapers
How to use a prefold diaper - 3 of the many ways to use them. You don't have to pin! But you can pin or Snappi the diaper, and that is very easy to learn.
Fastening the diaper is optional. You don't need to fasten it at all! You can let the cover hold it in place, by just putting it in the cover. But fastening with pins or a Snappi is another option. Watch the video to learn how to pin a prefold diaper. The video is explaining it very slowly so it seems harder than it really is. It's really easy once you try. Pinning will open up a whole world of very effective and very economical cloth diapering. If you take a little bit of time to learn how to pin, you can save a ton of money. I (Karen) really enjoy pinning. I think a pinned diaper is really cute and it absolutely works!
Watch a video to learn how to pin a prefold diaper.
New to cloth and overwhelmed by the choices? Click here.
The No Pins Method (called "trifolding" for wrap style covers:


Steps for folding the prefold:
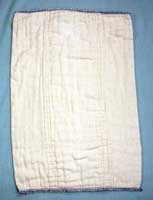
1) Lay the prefold diaper out flat.
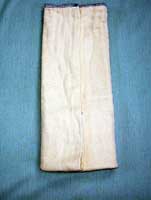
2) Fold down front to attain desired length.
3) The fold in both sides, this is the "fold in thirds" step.
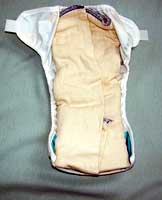
4) Lay folded prefold in wrap style cover. Done!
If you are organized, you can have a pile of these diapers already in the covers ready to go.
You can fan out the back of the diaper, so less cover touches baby's skin. Follow the pictures below for Flying Angel Wing but then just don't pin or Snappi it. Just close the wrap style cover. I like to bring the wings around to the front when I don't pin for three reasons. I like cotton next to baby's hips, the diaper stays in place better, and the poop pocket formed by fanning out the back helps keep poop off the covers.
Or, if you are like me and can never get organized enough to have diapers already in covers ready to go, you can do it in a different order. Lay the cover out on the changing table then place the unfolded prefold loosely over it. Then place baby on it. Fold just the front part in thirds and bring the diaper and cover up between baby's legs and close the cover. This forms a nice, low "poop pocket" with the sides of the material not folded in thirds becoming like "rails" on the side to keep poop on the cotton and off the cover. This method is a little sloppier so be sure to tuck in any parts of the diaper that are not inside the cover. Be sure the cover is tucked in and no cotton sticks out.
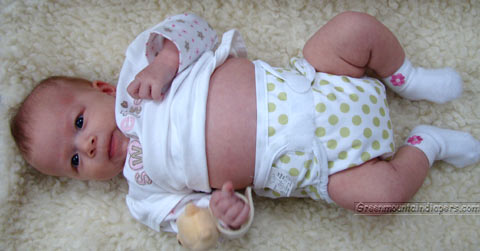
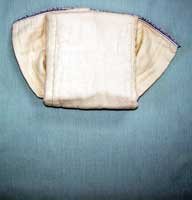
Below is a Cloth-eez Prefold Small Yellow Edge pad folded into a wrap style cover. Then just lay baby down on the diaper, pull it up between the legs, and fasten the cover. Yes, it's that easy. This baby is 11 pounds, 8 weeks old:

The Flying Angel Wing:
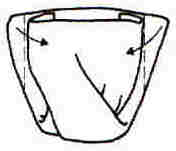
Lay diaper flat. Place baby on diaper so that a short side of the diaper is at the baby's waist. Fold in the part that the baby's bottom isn't on into thirds and bring that section up between the baby's legs. Bring the back sides around to the front and pin.
Clear as mud, huh. Here are some more pictures:
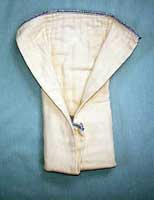

Fold the front in thirds and fan out the back.
Bring the diaper up between baby's legs.
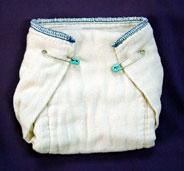
Snappi or pin the diaper to fasten it. A Snappi Fastener is shown above on left, pins on right. Then cover with any style cover.
The Twist
This method results in larger leg openings. Lay diaper flat, lay baby on diaper. Flip the bottom of the diaper over 180º. Pull up between baby's legs and pin.

Making the change
There are lots of ways to do this. Here's what I've found works for me:
Diaper pail of your choice. The easiest diaper pail to use is an inexpensive tall kitchen garbage can with a washable pail liner. You can also use a pail made for disposable diapers, but they are small so you may need two of them. Always leave the cover open to allow air and light. Don't cram the diapers in; drop them loosely in to prevent mold and bacteria growth. The two pail system is great for 2 story houses with two changing stations. Don't put any water in your pail. It's not necessary and is a drowning hazard. You can sprinkle some baking soda in it if you choose. Plastic spatula for scraping the poop into the potty when stools are unformed or The Potty Pail.
Wet-
Changing a wet cloth diaper is just the same as changing a disposable diaper. But don't throw it out! Just put it in the diaper pail. No rinsing or dunking is necessary, but you can rinse if you choose. Sometimes when a diaper is just wet you don't even need to use any wipes, or you can spritz baby's bottom with something like Moondance Soaps Diaper Lotion Potion to freshen if needed then pat dry with a dry wipe. Or just air dry baby's bottom for a few moments. Play with baby while air drying. Changing diapers can be fun!
Soiled-
If possible, change poopy diapers on the floor of the bathroom on a spare toddler sized prefold diaper or a washable Changing Pad . Babies can not fall off of the floor! Wet down a few wipes with warm water at the sink and have within reach. You can use a touch of gentle soap on them if you choose to, or Diaper Lotion Potion. Use a clean section of the messy diaper for the main mess. Use the warm, wet wipes for the final clean up. Pat dry with another wipe. Put on another diaper. Flip poop into potty and flush. If poop is unformed, scrape off with designated spatula and use the back of the spatula to squeeze out water from the diaper against the side of the toilet or use The Potty Pail to spray it off. If poop is from a totally breastfed baby, there is no need to rinse or dunk at all. It washes out like yogurt, but you may need to run an additional wash cycle if you don't "dunk". Put the diaper in the diaper pail or hanging wet bag. Leave pails, hampers, and bags open to air and light for the majority of the time.
If your bathroom is too small to do this, or if you just prefer using a changing table, here are some other hints. If a sink is not nearby, or for traveling, small squeeze bottles such as ones you can buy in the hair care section of stores that are intended for hair coloring, are useful. Fill squeeze bottle with water. Squirt onto wipes as you need them, and squirt water or a wipes solution either directly onto baby's bottom or onto the wipe. If you prefer, you can touch a wipe to a bar of very gentle soap. If you use soap on a wipe, follow with another wipe with just plain water to rinse off any soap residue. Pat dry with another wipe. If you don't have a sink nearby, a wipes warmer such as a Dex or a Prince Lionheart works or any container is fine. Our wipes fit perfectly in wipes warmers made for disposable wipes! Another great idea to keep water warm for making warm fresh wipes as needed is a Thermos Pump Pot (water stays warm for 2 days in this!) or any other insulate beverage holder.
Be careful with homemade wipes solution recipies becaues overdoing even by a little bit some of the ingredients, such as calendula oil or tea tree can really cause a red bottom! It's good to keep it simple with a good wipes product. It is very easy to get a red baby bottom from faulty homemade wipes recipes and please don't use typical store-bought baby shampoo. We see that suggested on a lot of sites but it's not a good thing to do. Read the ingredients and you will know why that is not appropriate. The more ingredients you put on your wipes, the more likely it is that irritations, rashes or allergies can occur. Simple, fresh, plain water is often not enough to clean a poopy bottom, so we do recommend something on the wipes for the poopy changes. At a minimum, a touch of olive oil will do. Make it fresh daily to avoid mold. Do not use antibacterial products on the wipes! Babies need their protective natural skin bacteria to be healthy, not killed! Keeping the diapers low pH also helps the skin's natural protective bacteria to flourish and that keeps rashes away. Skin is healthiest when the pH is below 7. High pH, ammonia, causes redness, as does unrinsed laundry detergent which is high pH. And of course, wipe or wash off the poop somehow. Unwiped poop will cause a rash. Change baby promptly whenever there is a bowel movement of course.
How to wash diapers